Where to find the Data Validation status
Data Validation status in Historical Performance
Reconciling 'Incomplete' status
'Confirmed' Status in Decision Critical
Historical Performance: Data Validation
Once your actual accounting and other data are in the system and once your source accounts have been mapped to the Decision Critical chart of accounts for your company, it is recommended to first run a check for data consistency and accuracy before proceeding to Variance Analysis.
Decision Critical's built-in Data Validation function helps you confirm that all financial information imported / input in previous steps is comprehensive, error-free and internally consistent. This step is important in order to ensure a valid basis for the Variance Analysis exercise.
Where to find the Data Validation status
Data Validation is located in the sub-header of each period column in the "Historical Performance" interface.

Finding Data Validation Status:
-
Navigate to Historical Performance: Start by accessing the 'Historical Performance' section in Decision Critical.
This is where all your historical financial and operational data, including the balance sheet, income statement (P&L), cash flow statement and operations report, are managed. Select a report by clicking on the tabs in the header (or to the right of the header). -
Select the Desired Timeframe: Use the date range selector at the top of the screen to choose the periods you want to validate. This timeframe should match the period for which you intend to perform Variance Analysis.
-
Check the Data Status: Look for the status indicators next in the column header for each period. These will typically show statuses such as 'Tentative', 'Pending' , 'Incomplete' or 'Confirmed' (see below).
Data Validation status in Historical Performance
-
Pending (Initial status / empty period)
Period columns start with a Pending status. This is the default status for new data entries and for periods with only zero values.
-
Incomplete (In process / requires attention)
If data in the reports are internally inconsistent (ex.: a balance sheet that is out of balance) or if one or more cross-checks was failed (ex.: net income on the income statement does not match change in retained earnings / current earnings on the balance sheet), the validation status will be Incomplete.
This indicates that work on the period(s) in question is ongoing or that there are reconciliation issues that need to be addressed. Exercise caution when analyzing periods marked Incomplete.
-
Tentative (Needs verification)
When you fill in data that clear all automatic reconciliations and cross-checks but haven't been manually verified, the period status will update to Tentative. Tentative data are eligible for final confirmation by an authorized user.In most cases, tentative data are treated as credible and complete. However, as an additional control, it is recommended to have the an authorized user review and reconcile the entire period.

-
Confirmed (Fully verified and reconciled)
Once the data have been verified by an authorized user, the status changes to Confirmed. This status means that the data have been reviewed and confirmed to be consistent and error-free. Confirmed data are locked and cannot be changed without reverting the period status to Tentative. Confirmed data are reliable and can be confidently used for decision-making, analysis and as a source of assumptions for forecasting.
How to reconcile periods with 'Incomplete' status
In the Historical Performance module of Decision Critical, a status of 'Incomplete' normally means that upload / input of data for the period or account mapping is still in progress. If data input is complete and all accounts with data have been mapped, however, then a status of 'Incomplete' indicates an issue with the historical data.
Here's are some tips for troubleshooting:
- Check for Imbalances:
- Balance Sheet: Look at each side of the balance sheet separately—Assets vs. Liabilities and Equity. Ensure that the total assets equal the sum of liabilities and equity.
If they don’t, use section totals to localize the problem and review entries for accounts in these sections to find and correct any discrepancies, such as missing data or incorrect values. - Income Statement: Check that the net income (or loss) on the income statement matches the sum change in the cumulative earnings accounts (Current Earnings, Retained Earnings, etc.) for the beginning and ending balance sheets of that period.
If the numbers aren't the same, use section totals to find the source of the difference and update data accordingly.
If you are importing your data, it is usually less labor-intensive to debug your source file than it is to change values once they are imported. Therefore, when preparing your import file, make sure that:
(1) All statements for adjacent periods are internally consistent and reconcile to each other;
(2) The import file does not contain monetary values of <0.01 (the system automatically truncates all digits after the second decimal place for monetary reports).
- Balance Sheet: Look at each side of the balance sheet separately—Assets vs. Liabilities and Equity. Ensure that the total assets equal the sum of liabilities and equity.
-
Update and Validate New Values:
Correct the data as you reconcile and, upon completion, recheck the report. In Decision Critical, you can manually revalidate individual changed values or the validation status of the entire period in the control drop-down in the column header for the period. The validation status will update automatically once all issues are resolved. -
Review Impact on Other Reports:
An 'Incomplete' status in one account or report period affects all related financial reports for that period. If you notice an incomplete status in any report, ensure all interconnected reports are also reviewed and corrected if needed.
By systematically checking for imbalances, correcting errors, and revalidating the data, you can quickly resolve 'Incomplete' statuses and ensure your financial data is ready for accurate analysis in Decision Critical.
'Confirmed' Status in Historical Performance
To ensure your financial data is fully validated and ready for analysis, it's recommended to conduct an additional manual review.
Periods with a 'Tentative' status are treated as provisionally valid, but the status 'Confirmed' will be automatically assigned when all values have been validated. The period will then be locked so as to prevent further edits.

Batch-Verification of Values
In addition to detailed cell-by-cell verification of values (accessed via the menu under the ellipses button which appears when hovering on a specific value in the report) there are two methods which allow for batch verification of values in the historical statements.
-
Verify Entire Period (Column-based confirmation)
-
Hover Over the Date: Start by hovering your mouse over the date at the top of the column you wish to verify until the menu button appears.
-
Click the Menu Button: Once you see the menu button (three bars), click on it to open the options.

-
Select 'Verify All Inputs': In the dropdown menu, choose the 'Verify All Inputs' option.
-
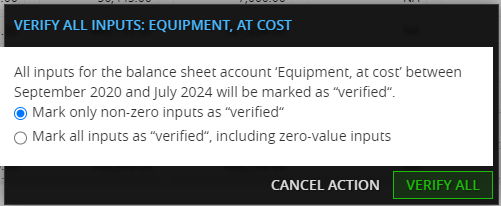
Choose Between Verification Options: You will be prompted to select either 'Mark only non-zero inputs as verified' or 'Mark all inputs as verified, including zero-value inputs.' Choose the option that best fits your needs.
Choose Verification Type: You will see two options:-
Mark only non-zero inputs as 'verified': This option verifies only the data entries with non-zero values, leaving out zero or 'NA' entries. It’s useful when you want to focus on significant data and keep the period status 'Tentative' for further review.
-
Mark all inputs as 'verified,' including zero-value inputs: This option verifies all entries, including zero values and 'NA', confirming that all data for the period is accurate and locking it as 'Confirmed.' It's ideal when no further edits are needed.
-
- Click the 'VERIFY ALL' button.
-
-
Verify Specific Account (Row-based confirmation)
-
Locate the Options: Find the menu button under the ellipses next to the account name you want to verify. Click on this button to open the options menu.

-
Select the Verify Option: In the options menu, look for the button with a check mark and click it.
-
Choose Verification Method: A dialog box will appear asking how you want to verify the inputs. You can select "Mark only non-zero inputs as verified" to confirm only entries with non-zero values, or "Mark all inputs as verified, including zero-value inputs" to confirm all entries, even those with zero values.
-
Confirm Verification: Once you've selected your preferred verification method, click 'VERIFY ALL' button to finalize the process. This will lock the data for the selected account, marking it as confirmed and ready for use in further analysis.
Need help? 💡
If you need additional help, reach out to us at:
support@decisioncritical.pro -